

Introduction
Artificial intelligence can add useful features to a WordPress website without requiring you to build an entire application from scratch.
For example, you can connect the OpenAI API to WordPress and create features such as an AI chatbot, content assistant, FAQ generator, product description generator, or custom AI tool.
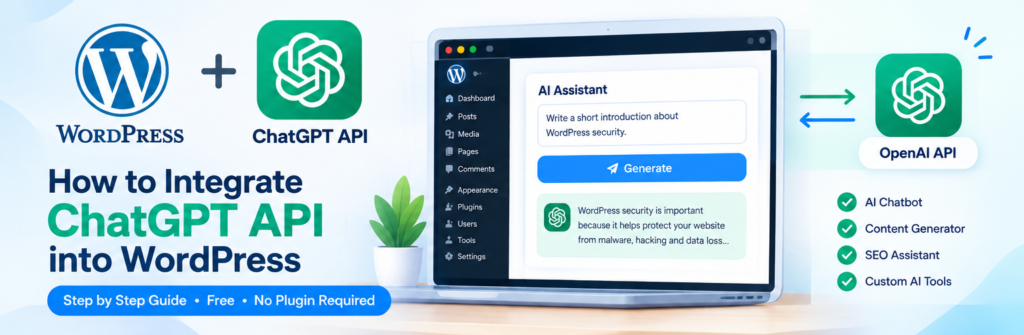
In this guide, we’ll show you how to Integrate ChatGPT API into WordPress using custom PHP code.
The important thing to understand first is that the API is separate from ChatGPT’s normal web or app experience. API usage is billed separately based on usage, so “free” in this tutorial means you can build the integration without purchasing a separate WordPress AI plugin or paying for development work. OpenAI currently lists API models with usage-based token pricing.
We’ll keep the example simple so you can understand how the connection works and then customize it for your own website.
What Is the ChatGPT API?
The OpenAI API allows software applications to send requests to OpenAI models and receive generated responses.
Your WordPress website can communicate with the API using PHP.
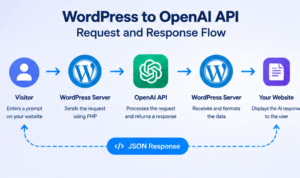
The basic process looks like this:
WordPress → PHP → OpenAI API → AI Response → WordPress
For example, a visitor could enter:
Write a short introduction about WordPress security.
Your WordPress website sends that request to the API, and the generated response can then be displayed on the page.
This gives you much more flexibility than simply embedding a chatbot from another service.
What Can You Build With the OpenAI API?
Once you Integrate ChatGPT API into WordPress, you can create many different features.
For example:
- AI chatbot
- Content generator
- Blog title generator
- Meta description generator
- FAQ generator
- Product description generator
- Comment assistant
- Writing assistant
- Custom customer-support tool
- AI-powered search assistant
The exact functionality depends on the code you build around the API.
Is the ChatGPT API Free?
This is an important point before you start.
The API itself is not the same thing as a free ChatGPT account.
OpenAI provides API access with usage-based pricing. Current API pricing varies by model and is calculated according to tokens processed.
So if you’re searching for a way to Integrate ChatGPT API into WordPress for free, there are two different meanings:
Free integration: You don’t need to purchase a WordPress plugin or hire a developer.
Free API usage: This depends on whether your API account has any applicable credits or promotional access. You should check your current API billing and usage before relying on free usage.
You can also monitor API activity and token usage through the OpenAI usage dashboard.
What You Need Before Starting
You don’t need a complicated setup.
You’ll need:
- A WordPress website
- Access to your WordPress files
- An OpenAI API account
- An API key
- Basic PHP knowledge
- A safe place to store the API key
You should also have a backup of your website before adding custom PHP code.
Step 1: Create an OpenAI API Key
The first step is to create an API key through the OpenAI developer platform.
The API key works like a password that allows your WordPress application to authenticate API requests.
Never publish your API key inside your frontend JavaScript or publicly visible HTML.
Keep it on the server side.
If someone obtains your API key, they may be able to make API requests using your account.
Step 2: Decide Where to Add Your WordPress Code
There are several ways to add custom PHP code to WordPress.
You can use:
- A custom plugin
- Your child theme’s
functions.php - A code-snippets plugin
- A custom WordPress plugin created specifically for the AI feature
For a permanent API integration, a small custom plugin is usually easier to maintain than putting a large amount of code inside your theme.
This also means changing your theme won’t remove the integration.
Step 3: Create a Simple WordPress AI Function
Here’s a basic example showing the concept.
function my_openai_request( $prompt ) {

    $api_key = 'YOUR_OPENAI_API_KEY';

    $response = wp_remote_post(
        'https://api.openai.com/v1/responses',
        array(
            'headers' => array(
                'Content-Type'  => 'application/json',
                'Authorization' => 'Bearer ' . $api_key,
            ),
            'body' => wp_json_encode(
                array(
                    'model' => 'YOUR_MODEL',
                    'input' => $prompt,
                )
            ),
            'timeout' => 30,
        )
    );

    if ( is_wp_error( $response ) ) {
        return 'API request failed.';
    }

    $body = json_decode(
        wp_remote_retrieve_body( $response ),
        true
    );

    return $body;
}
The exact model name should be selected from the models available to your API project rather than blindly copying an old tutorial. OpenAI’s current model documentation lists available models and their supported endpoints.
Step 4: Never Hard-Code Your API Key Publicly
The example above demonstrates how the authentication works, but you should avoid leaving a production API key directly inside a publicly shared code snippet.
A better approach is to store the key securely on the server.
For example, you could define it in your WordPress configuration:
define(
    'OPENAI_API_KEY',
    'your-api-key-here'
);
Then your custom plugin can retrieve it:
$api_key = OPENAI_API_KEY;This keeps the API key separate from the main plugin code.
You should also make sure your wp-config.php file isn’t publicly accessible through your web server.
Step 5: Send a Prompt to the API
Once authentication is configured, your WordPress code can send a prompt.
For example:
$response = my_openai_request(
    'Write a short introduction about WordPress security.'
);
The API processes the request and returns a response.
Your WordPress code can then process that response and display the relevant text to the visitor.
Step 6: Process the API Response
When your WordPress server receives a response, you shouldn’t immediately print the entire API response.
Instead, inspect the response and extract the content your application needs.
The exact response structure depends on the API endpoint and the request format you’re using.
You should also handle errors.
For example:
if ( is_wp_error( $response ) ) {

    return 'Something went wrong. Please try again.';
}
You can also check the HTTP response code before displaying the result.
This helps prevent API errors from being shown directly to visitors.
Step 7: Create a Simple WordPress Shortcode
A shortcode makes it easier to display your AI feature inside WordPress pages or posts.
For example:
function my_ai_shortcode() {

    ob_start();
    ?>

    <form method="post">

        <textarea
            name="ai_prompt"
            placeholder="Ask something..."
            required
        ></textarea>

        <button type="submit">
            Ask AI
        </button>

    </form>

    <?php

    return ob_get_clean();
}

add_shortcode( 'my_ai_tool', 'my_ai_shortcode' );
You could then place this shortcode inside a WordPress page:
[my_ai_tool]This creates the basic frontend structure.
The next step is connecting the submitted prompt to your server-side API function.
Important Security Warning
Don’t send your OpenAI API key directly to the browser.
For example, avoid putting the key inside:
const apiKey = "YOUR_API_KEY";Anyone visiting your website could potentially inspect the page and obtain the key.
Instead:
Browser → WordPress Server → OpenAI API
is the safer architecture.
The browser sends the user’s request to your WordPress server, and the server communicates with OpenAI.
Step 8: Add Input Validation
Never send completely unvalidated user input directly to an external API.
WordPress provides useful sanitization functions.
For example:
$prompt = sanitize_textarea_field(
    $_POST['ai_prompt'] ?? ''
);
You can also limit the length of the prompt.
For example, if your tool only needs short questions, there’s no reason to accept extremely large requests.
This can help reduce unnecessary API usage and costs.
Step 9: Protect the WordPress Form
If you’re creating an AI tool that accepts user input, use WordPress security features such as nonces.
For example:
wp_nonce_field(
    'my_ai_action',
    'my_ai_nonce'
);
Then verify the nonce before processing the request.
This helps protect your form from unwanted requests.
You should also consider:
- Rate limiting
- User authentication
- CAPTCHA
- Request limits
- Input validation
- Error handling
These become particularly important if your AI tool is publicly accessible.
Step 10: Test Your WordPress AI Integration
After adding the code, don’t immediately publish the feature to all visitors.
First test it yourself.
Try a simple prompt such as:
Write three tips for improving WordPress security.Then test:
- Empty input
- Very long input
- Invalid requests
- Multiple requests
- API errors
- Logged-out visitors
- Mobile devices
Make sure the API key never appears in the page source or browser developer tools.
11. Create a Complete WordPress AI Form
If you want visitors to interact with an AI tool directly on your WordPress website, you can create a simple form where users enter their questions and receive an AI-generated response.
A basic form can look like this:
<form id="my-ai-form">
    <textarea id="ai-prompt" placeholder="Ask something..."></textarea>

    <button type="submit">
        Ask AI
    </button>

    <div id="ai-result"></div>
</form>
The most important part is that the visitor’s request should not be sent directly from the browser to the OpenAI API.
Instead, use this structure:
Visitor → WordPress Server → OpenAI API → WordPress Server → Visitor
This approach helps keep your API key hidden from website visitors.
12. Use AJAX to Get AI Responses Without Reloading
A standard WordPress form submission may reload the entire page. AJAX allows you to send the request in the background and display the AI response without refreshing the page.
For example:
jQuery(document).ready(function($) {

    $('#my-ai-form').on('submit', function(e) {
        e.preventDefault();

        const prompt = $('#ai-prompt').val();

        $('#ai-result').text('Generating response...');

        $.ajax({
            url: myAI.ajax_url,
            type: 'POST',
            data: {
                action: 'my_ai_request',
                prompt: prompt,
                nonce: myAI.nonce
            },
            success: function(response) {

                if (response.success) {
                    $('#ai-result').text(response.data);
                } else {
                    $('#ai-result').text(response.data);
                }

            },
            error: function() {
                $('#ai-result').text('Something went wrong.');
            }
        });

    });

});
On the PHP side, you can register the WordPress AJAX actions:
add_action('wp_ajax_my_ai_request', 'my_ai_request');
add_action('wp_ajax_nopriv_my_ai_request', 'my_ai_request');

function my_ai_request() {

    check_ajax_referer('my_ai_nonce', 'nonce');

    $prompt = isset($_POST['prompt'])
        ? sanitize_textarea_field(wp_unslash($_POST['prompt']))
        : '';

    if (empty($prompt)) {
        wp_send_json_error('Please enter a question.');
    }

    // Process the API request here.

    wp_send_json_success('AI response will appear here.');
}
This provides a foundation for building a more interactive WordPress AI tool.
13. Keep Your OpenAI API Key Secure
API key security is one of the most important parts of any API integration.
Never place your API key directly inside JavaScript:
const apiKey = "YOUR_API_KEY";You should also avoid putting the key inside publicly accessible HTML or other frontend code.
One simple option is to store the key in your wp-config.php file:
define('OPENAI_API_KEY', 'your-api-key-here');You can then access it from your PHP code:
$api_key = OPENAI_API_KEY;This keeps the API key on the server rather than exposing it to website visitors.
For production websites, environment-based configuration can also be considered when supported by your hosting setup.
14. Add Rate Limiting to Your AI Tool
If your AI feature is available to public visitors, users may send many requests in a short period.
That can increase API usage and potentially increase your costs.
WordPress transients can be used to create a basic rate-limiting system.
For example:
$rate_key = 'ai_limit_' . md5($_SERVER['REMOTE_ADDR']);

if (get_transient($rate_key)) {
    wp_send_json_error('Please wait before sending another request.');
}

set_transient($rate_key, true, 30);
This example creates a short waiting period between requests.
For a production website, you may want to create more sophisticated limits based on logged-in users, IP addresses, user roles, or other application-specific rules.
15. Control API Usage and Costs
The term “free” in this tutorial refers to creating the WordPress integration without necessarily purchasing a dedicated AI WordPress plugin or hiring a developer.
The OpenAI API itself uses usage-based pricing, and costs depend on the selected model and the number and type of tokens processed.
For that reason, consider adding usage controls to your WordPress AI feature.
You can:
- Limit the maximum prompt length
- Limit requests per visitor
- Prevent repeated submissions
- Monitor API usage regularly
- Choose an appropriate model
- Avoid unnecessarily long responses
- Add authentication when appropriate
OpenAI also provides a Usage Dashboard that can be used to review API activity and token usage.
This becomes especially important if your AI feature is publicly accessible.
16. Add Custom AI Buttons to WordPress
Your AI integration does not have to be limited to a chatbot.
You can create custom buttons for different WordPress tasks, such as:
- Generate Introduction
- Rewrite Content
- Generate FAQ
- Create Meta Description
- Summarize Article
- Generate Product Description
- Generate Blog Ideas
- Improve Existing Content
For example:
<button type="button" id="generate-intro">
    Generate Introduction
</button>
When the button is clicked, JavaScript can send a request to WordPress using AJAX.
WordPress then processes the request and communicates with the OpenAI API.
This approach allows you to create a lightweight custom AI assistant specifically for your website.
17. Handle API Errors Properly
API requests can fail for several reasons.
Common causes include:
- Invalid API key
- Authentication problems
- Incorrect API request format
- Invalid or unavailable model
- Temporary API problems
- Rate limits
- Empty user input
- Request size limitations
- Account or usage restrictions
Always check whether the WordPress HTTP request was successful.
For example:
$response = wp_remote_post($url, $args);

if (is_wp_error($response)) {
    return 'Unable to connect to the API.';
}

$status_code = wp_remote_retrieve_response_code($response);

if ($status_code < 200 || $status_code >= 300) {
    return 'The AI request could not be completed.';
}
Instead of displaying technical API errors to visitors, provide a simple user-friendly message.
Detailed debugging information can be logged for administrators, but never store API keys or other sensitive information in logs.
18. Improve Your AI Prompts
Connecting your website to the API is only one part of the process. The quality of your prompts also affects the usefulness of the generated response.
For example, this prompt is very basic:
Write a blog introduction.A more detailed prompt could be:
Write a clear and SEO-friendly introduction for a WordPress tutorial.

Topic: How to speed up a WordPress website.
Audience: Beginners.
Keep the introduction concise and easy to understand.
You can also generate prompts dynamically using WordPress variables.
For example:
$prompt = "Write a short introduction for this WordPress topic: " . $topic;This allows the same API function to work with different content types.
19. Create a Simple WordPress Chatbot
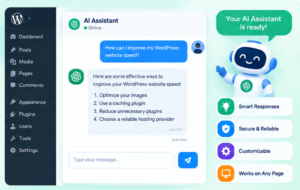
Once the basic integration is working, you can turn it into a chatbot-style interface.
For example:
User:
How can I speed up my WordPress website?

AI:
You can improve WordPress performance by optimizing images,
using caching, reducing unnecessary plugins, and improving
server performance.
A simple frontend structure could be:
<div id="chat-messages"></div>

<textarea id="chat-input"></textarea>

<button id="send-message">
    Send
</button>
Each new message can be sent to WordPress using AJAX.
The WordPress backend then processes the message and sends the API response back to the browser.
If you build a multi-turn chatbot, remember that conversation history can increase the amount of input sent to the API. Managing the amount of context can therefore help control token usage.
20. Integrate ChatGPT API With Elementor
If your website uses Elementor, you can combine Elementor’s frontend design capabilities with custom WordPress backend functionality.
For example, you can create an interface containing:
- Textarea
- AI button
- Loading message
- Response box
- Error message
The Elementor interface handles what visitors see, while the WordPress backend handles the API request.
Do not place your API key inside an Elementor HTML widget or frontend JavaScript.
Instead, keep the API key on the server and allow WordPress to communicate with the OpenAI API.
If you plan to reuse the functionality across multiple pages, creating a lightweight custom plugin can make the system easier to maintain.
21. Create a Small Custom WordPress Plugin
Instead of placing all of your code inside the theme’s functions.php file, you can create a dedicated plugin.
A basic structure could look like this:
wp-content/
└── plugins/
    └── my-ai-tool/
        └── my-ai-tool.php
The plugin file can start with:
<?php

/*
Plugin Name: My AI Tool
Description: Custom AI functionality for WordPress.
Version: 1.0
*/
You can then organize your AI functionality inside the plugin, including:
- API functions
- AJAX handlers
- Shortcodes
- Security checks
- Input validation
- Rate limiting
- Frontend scripts
One major advantage is that your AI functionality can remain active even if you change your WordPress theme.
22. Common Mistakes to Avoid
Exposing the API Key
Never expose your API key through JavaScript, HTML, shortcodes, or other frontend code.
Ignoring API Usage
Public AI tools can generate unexpected API requests. Monitor usage and create appropriate limits.
Skipping Input Validation
Always sanitize and validate user input before processing it.
Not Using Nonces
WordPress AJAX requests should use appropriate nonce protection.
Allowing Unlimited Requests
Unlimited public requests can result in unnecessary API usage.
Using an Outdated Endpoint or Model
Always check the current OpenAI API documentation and available models before implementing your integration. OpenAI’s model comparison documentation provides information about current model capabilities and supported features.
Assuming ChatGPT and API Billing Are the Same
A ChatGPT subscription and API usage are separate products and billing systems. Check your API account and billing settings before launching a public AI feature.
Frequently Asked Questions
Is the ChatGPT API completely free?
The API should not be assumed to be completely free. API usage can be billed according to the selected model and token usage.
In this tutorial, “free” refers primarily to building the WordPress integration using your own code instead of paying for a dedicated AI plugin or custom development.
Can I integrate the OpenAI API without a WordPress plugin?
Yes. You can use custom PHP, WordPress shortcodes, AJAX, or REST API functionality to build the integration.
For larger projects, however, a dedicated custom plugin can make the code easier to manage.
Where should I store the API key?
Store the API key on the server, such as in wp-config.php or an appropriate environment configuration.
Never expose it in frontend JavaScript.
Can I use the API with Elementor?
Yes. Elementor can be used to create the frontend interface while WordPress handles the API communication on the server.
Can website visitors use my AI tool?
Yes. You can create a public AI form, but you should add security controls, input validation, rate limiting, and usage monitoring.
Can I create a WordPress chatbot using the API?
Yes. WordPress AJAX or REST-based functionality can be combined with the OpenAI API to create a chatbot-style interface.
How can I monitor API usage?
The OpenAI Usage Dashboard can be used to review API activity and token usage.
Related Articles
You can connect this tutorial with these existing articles on your website:
- Content AI 2.0: Introducing AI SEO Inside WordPress
- 7 Best Content Optimization Plugins for WordPress
- How to Setup Rank Math SEO Plugin Correctly for Higher Rankings
- How to Create a Custom Header in WordPress Without Code
- How to Deactivate WordPress Plugins When Locked Out of Admin Dashboard
Final Thoughts
Integrating the ChatGPT API into WordPress can turn a regular website into a more interactive and automated platform.
With custom PHP, AJAX, WordPress shortcodes, and the OpenAI API, you can build features such as AI content tools, chatbots, FAQ generators, writing assistants, and custom admin tools without relying entirely on third-party WordPress plugins.
The most important things to remember are API key security, input validation, nonce protection, rate limiting, error handling, and usage monitoring.
Start with a simple AI form and expand the functionality as your website grows. A basic API integration can eventually become a complete custom AI system for your WordPress website.


Pingback: Top 5 Trending AI Chatbot Plugins for WordPress in 2026