

Introduction
If your domain is currently registered with another company and you want to manage your website and domain from one dashboard, you can Transfer a Domain Name to Hostinger.
Moving your domain registration to Hostinger can make domain management easier because your hosting, DNS settings, SSL configuration, and domain can be managed from the same hPanel account.
However, a domain transfer is different from simply moving a WordPress website. A domain transfer changes the registrar, while website migration moves your website files and database to a new server. Hostinger recommends migrating the website and email first when moving services from an external provider, then transferring the domain.
In this guide, you’ll learn 9 easy steps to Transfer a Domain Name to Hostinger, including how to unlock your domain, get the EPP code, start the transfer, choose nameservers, avoid downtime, and troubleshoot common transfer problems.
What Does Domain Transfer Mean?
When you Transfer a Domain Name to Hostinger, you’re moving the domain’s registration from your current registrar to Hostinger.
For example:
Current Registrar
       ↓
Your Domain
       ↓
Hostinger
After the transfer is complete, you can manage the domain through Hostinger’s hPanel.
This does not automatically mean your WordPress website files, database, or email accounts are transferred.
Your website may still be hosted somewhere else unless you separately migrate it or point the domain to Hostinger.
This distinction is important because many beginners think domain transfer and website migration are the same process.
They are not.
Domain Transfer vs Website Migration
Before you Transfer a Domain Name to Hostinger, understand these two processes.
| Process | What Changes? |
|---|---|
| Domain Transfer | Registrar of the domain |
| Website Migration | Website files and database |
| DNS Change | Where the domain points |
| Email Migration | Email service and messages |
| Hosting Transfer | Server where website is hosted |
You can transfer the domain to Hostinger while keeping the website hosted elsewhere.
You can also keep your domain registered with your existing registrar and simply point it to Hostinger.
Hostinger confirms that an external domain can be connected to Hostinger without transferring its registration.
Why Transfer a Domain Name to Hostinger?
There are several reasons website owners choose to Transfer a Domain Name to Hostinger.
1. Manage Everything From One Dashboard
You can manage your:
- Domain
- Hosting
- DNS
- SSL
- WordPress website
- Email services
from one account.
2. Easier DNS Management
If your website is hosted on Hostinger and your domain is also managed there, DNS configuration can be easier.
3. Simpler Website Management
Instead of logging into multiple providers, you can manage your domain and hosting through one platform.
4. Convenient Billing
Managing services through one provider can make renewals and billing easier to track.
5. Easier WordPress Setup
If you’re building a new WordPress website, keeping the domain and hosting together can simplify the initial setup.
Before You Transfer a Domain Name to Hostinger
Don’t start the transfer immediately.
First, check whether your domain is eligible.
Hostinger currently lists several requirements, including domain ownership/control, an active domain, a valid EPP/Auth code, disabled DNSSEC, and generally at least 60 days since registration or the previous transfer. Hostinger also recommends starting early rather than waiting until the domain is close to expiration.
Check these items:
- You own the domain.
- Your domain is active.
- Your domain is not suspended.
- Your domain is not in redemption.
- At least 60 days have passed since registration or the last transfer.
- The domain is unlocked.
- You have the EPP/Auth code.
- DNSSEC is disabled.
- Your domain has enough time before expiration.
For many generic domains, ICANN transfer rules also include 60-day restrictions after initial registration, certain previous transfers, or qualifying changes to registrant information.
Step 1: Check Your Domain Expiration Date
Before you Transfer a Domain Name to Hostinger, check the domain expiration date.
You can usually find this information inside your current registrar’s dashboard.
Look for:
Domain → Manage → Expiration Date
Make sure the domain is active.
Don’t wait until the last few days before starting a transfer.
Hostinger recommends starting the transfer when the domain has at least 7 days remaining before expiration, because the transfer can take several days.
For additional safety, start earlier whenever possible.
Step 2: Unlock Your Domain
Most domain registrars have a transfer lock to prevent unauthorized domain transfers.
Before you Transfer a Domain Name to Hostinger, remove this lock.
Log in to your current registrar.
Open:
Domains → Manage Domain
Look for an option such as:
- Transfer Lock
- Domain Lock
- Registrar Lock
- Client Transfer Prohibited
Turn the lock off.
Your screen may look different depending on the registrar.
Hostinger specifically requires the domain to be unlocked before starting the transfer.
Step 3: Get Your EPP or Authorization Code
The EPP code is also called:
- Authorization Code
- Auth Code
- Transfer Code
- AuthInfo Code
This code helps prove that you’re authorized to transfer the domain.
Go to your current registrar’s domain management area.
Look for:
Transfer Domain → Authorization Code
or:
EPP Code
Copy the code carefully.
Don’t share this code publicly.
ICANN explains that the Auth-Code is used to help identify the domain holder and prevent unauthorized transfers.
Step 4: Disable DNSSEC
Another important step before you Transfer a Domain Name to Hostinger is checking DNSSEC.
If DNSSEC is enabled, Hostinger may not be able to complete the transfer until it is disabled. Hostinger’s current transfer documentation explicitly lists disabled DNSSEC as a requirement.
Log in to your current registrar.
Look for:
DNS → DNSSEC
If DNSSEC is enabled, disable it.
Wait for the change to apply before continuing.
Don’t delete random DNS records while doing this.
DNSSEC and normal DNS records serve different purposes.
Step 5: Create a Hostinger Account
Now create or log in to your Hostinger account.
You’ll need:
- Hostinger account
- Domain name
- EPP/Auth code
- Payment method if the transfer requires payment
- Access to your domain’s administrative email
If you already have a Hostinger account, simply log in.
Then open the domain transfer area.
Official Resource:
Hostinger Domain Transfer Guide
Step 6: Start the Domain Transfer
Go to the Hostinger domain transfer page or open the transfer option inside hPanel.
Enter your domain name.
For example:
yourdomain.comClick:
Transfer
Hostinger will check the domain and continue the transfer setup if the domain is eligible.
Follow the instructions displayed on your screen.
The exact interface can change over time, so always follow the current options shown in your Hostinger account.
Step 7: Enter the EPP Code
Hostinger will ask for the authorization code from your current registrar.
Paste your EPP/Auth code into the appropriate field.
Double-check every character.
A single incorrect character can cause the transfer request to fail.
Then continue with the transfer order.
If your code doesn’t work, return to your current registrar and generate or copy the correct authorization code.
Do not repeatedly enter random codes.
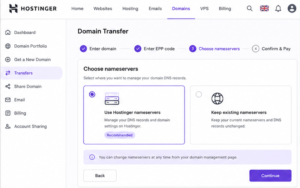
Step 8: Choose Your Nameserver Option
During the transfer process, Hostinger gives you options for handling nameservers.
Generally, you can:
Option 1: Keep Existing Nameservers
Choose this if your current website or email services are still running through another provider and you want to reduce the chance of downtime.
Your DNS management remains with the current provider.
Option 2: Use Hostinger Nameservers
Choose this if your website and services are moving to Hostinger or you want Hostinger to manage your DNS.
Hostinger notes that switching nameservers can affect active services hosted elsewhere, so check your DNS records carefully before changing them.
Step 9: Confirm the Transfer
After submitting your transfer request, check your email.
You may receive a confirmation message related to the domain transfer.
Open the email and follow the instructions.
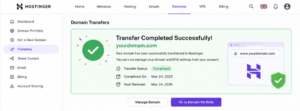
Hostinger states that after the transfer order is completed, an email about the transfer is sent and should be confirmed.
Then monitor the transfer status from your Hostinger account.
The transfer can take several days, so don’t panic if the domain doesn’t move immediately.
How Long Does a Domain Transfer to Hostinger Take?
The exact time depends on the domain extension and registrar.
For many standard domain transfers, the process can take several days.
Hostinger states that its transfer process may take up to 7 days and recommends planning accordingly.
During the transfer, your nameserver changes may be restricted.
That’s why you should decide your nameserver option before initiating the transfer.
Will My Website Go Down During the Transfer?
Not necessarily.
If your website is already live and you choose to keep the existing nameservers, your website can continue using the current DNS setup during the transfer.
This is particularly useful when your website is still hosted at the old provider.
However, if you switch nameservers and the DNS records aren’t configured correctly, your website or email may stop working.
Hostinger specifically recommends keeping existing nameservers when you need to avoid downtime for services connected to the domain at another provider.
What Happens After You Transfer a Domain Name to Hostinger?
Once you Transfer a Domain Name to Hostinger, the domain should appear inside your Hostinger account.
You can then manage:
- Domain registration
- DNS records
- Nameservers
- Renewal settings
- Domain ownership information
- Website connection
However, don’t assume your website is automatically migrated.
If your WordPress website is still hosted somewhere else, you’ll need to migrate the website or point the domain to Hostinger separately.
Hostinger recommends migrating the website and email before transferring the domain when moving services from an external provider.
Connect Your Domain to Hostinger Hosting
If your domain has been transferred but your website is not yet connected to Hostinger, you need to connect it to your hosting plan.
Open Hostinger hPanel.
Go to:
Websites → Add Website
Follow the setup process.
Depending on your hosting configuration, Hostinger can provide nameserver or DNS information that you need to use.
Hostinger’s current connection guide notes that DNS changes can take up to 24 hours to propagate globally, although many changes take effect sooner.
What About WordPress Website Files?
A domain transfer does not automatically move:
- WordPress files
- Database
- Images
- Themes
- Plugins
- Media
- Custom code
If your website is hosted with another provider, you need to migrate it separately.
For a WordPress website, this normally involves:
- Creating a complete backup.
- Moving WordPress files.
- Exporting the database.
- Creating a database on Hostinger.
- Importing the database.
- Updating configuration.
- Connecting the domain.
- Testing the website.
Hostinger provides both assisted and manual website migration options.
Internal Link:
Increase PHP Memory Limit in Hostinger
What About Email Accounts?
Be careful with email when you Transfer a Domain Name to Hostinger.
If your email is currently hosted somewhere else, changing nameservers without copying the required DNS records can interrupt email delivery.
Before changing DNS, record your existing:
- MX records
- TXT records
- SPF records
- DKIM records
- DMARC records
- CNAME records
If your email is moving to Hostinger as well, set up the email service and required DNS records before making the final DNS switch.
Hostinger notes that website migrations do not automatically include email services, which need to be migrated separately.
Check Your Website After the Transfer
After you Transfer a Domain Name to Hostinger, test your entire website.
Open:
https://yourdomain.comCheck:
- Homepage
- Blog posts
- Pages
- Images
- Contact forms
- Login page
- WordPress dashboard
- SSL certificate
- Internal links
- Mobile layout
Also check the www version:
https://www.yourdomain.comMake sure the correct version redirects properly.
Check SSL After Moving the Domain
A domain transfer itself doesn’t guarantee that your SSL configuration is correct.
After connecting your domain to Hostinger, verify that HTTPS works.
Check:
https://yourdomain.comIf you see:
Your Connection is Not Private
or another SSL error, check your certificate and DNS configuration.
Internal Link:
How to Fix Your Connection is Not Private SSL Error in WordPress
Make sure the SSL certificate covers the correct domain and that DNS points to the intended server.
Common Domain Transfer Errors
Sometimes your domain transfer doesn’t work on the first attempt.
Here are some common problems.
Error 1: Domain Is Locked
If Hostinger says the domain is locked, return to your current registrar and disable the transfer lock.
Hostinger notes that after unlocking a domain, it may take a short time for the change to become visible.
Error 2: Invalid EPP Code
If the EPP code is incorrect, contact your current registrar.
Generate a new authorization code if necessary.
Then enter the new code in Hostinger.
Error 3: Domain Is Too New
If the domain was registered recently, it may not be eligible for transfer.
For many domains, a 60-day restriction applies after initial registration or a previous transfer.
Wait until the restriction period ends before trying again.
Error 4: Recent Contact Information Change
Changing registrant information can trigger a 60-day transfer lock under applicable ICANN rules, although the registrar may provide an opt-out option in some circumstances.
If you recently changed:
- Registrant name
- Organization
- Registrant email
- Administrative contact information
check your registrar’s transfer policy before starting the transfer.
Error 5: DNSSEC Is Enabled
If DNSSEC is enabled, disable it before transferring the domain.
Then wait for the registrar to process the change.
Hostinger lists disabled DNSSEC among its transfer prerequisites.
Should You Transfer or Just Point Your Domain to Hostinger?
You don’t always need to transfer your domain.
If your domain is already registered somewhere you like, you can simply connect it to Hostinger.
Transfer Your Domain If:
- You want domain and hosting in one account.
- You prefer Hostinger’s domain management.
- You want to manage DNS from Hostinger.
- You want fewer separate provider accounts.
Keep Your Domain Elsewhere If:
- Your current registrar has better pricing for your TLD.
- You already have DNS configured there.
- Your email infrastructure depends heavily on the existing DNS setup.
- You don’t need to move the registrar.
Hostinger supports connecting externally registered domains to its hosting, so a full registrar transfer isn’t mandatory.
Security Tips Before You Transfer a Domain Name to Hostinger
Domain transfers should be treated as a security-sensitive process.
A domain controls where your website and many related services are reached.
To Secure Your WordPress Site, use a strong registrar password and enable two-factor authentication where available.
Also:
- Never share your EPP code publicly.
- Keep your registrar email secure.
- Review domain ownership information.
- Remove unknown users.
- Use a unique password.
- Enable 2FA.
- Keep WordPress updated.
- Maintain website backups.
- Review DNS records after migration.
A hacker who gains control of your domain account can potentially manipulate DNS or redirect visitors to another server.
A secure WordPress website therefore requires protection at both the WordPress and domain-account levels.
Common Mistakes to Avoid
Avoid these mistakes when you Transfer a Domain Name to Hostinger:
- Starting the transfer without an EPP code.
- Forgetting to unlock the domain.
- Leaving DNSSEC enabled.
- Changing nameservers without checking DNS records.
- Forgetting about email MX records.
- Waiting until the domain is about to expire.
- Assuming domain transfer also migrates WordPress.
- Changing registrant information immediately before transfer.
- Sharing your authorization code.
- Not creating a website backup.
- Forgetting to test SSL after the transfer.
- Ignoring DNS propagation.
A little preparation can prevent most transfer-related problems.
Frequently Asked Questions
Can I Transfer a Domain Name to Hostinger without moving my website?
Yes.
You can transfer the domain registration while keeping your website hosted somewhere else.
You can also keep the domain at your current registrar and simply connect it to Hostinger hosting.
How long does it take to Transfer a Domain Name to Hostinger?
For many domains, the transfer can take several days. Hostinger states that its domain transfer process can take up to 7 days.
Do I need an EPP code to transfer my domain?
For most standard domain transfers, yes. The EPP/Auth code is provided by your current registrar.
Some country-code domains use different transfer procedures, so the exact requirement depends on the domain extension.
Will transferring my domain delete my WordPress website?
No.
A domain transfer changes the registrar. It does not automatically delete your WordPress files or database.
However, incorrect DNS changes can make your website temporarily inaccessible, so always prepare your DNS configuration before making changes.
Can I transfer a .PK domain to Hostinger?
Domain transfer rules vary by TLD.
Hostinger’s current documentation lists specific renewal behavior for .pk and other country-code domains, so you should check Hostinger’s current transfer availability for your exact extension before starting.
Should I keep my existing nameservers during the transfer?
If your website and email are still running through another provider, keeping the existing nameservers can help avoid unnecessary downtime.
If your website and services are already moving to Hostinger, using Hostinger nameservers may make DNS management easier.
Can a hacker steal my domain during a transfer?
A domain transfer requires authorization, but you should still protect your registrar account.
Use a strong password, enable 2FA, protect your email account, and never share your EPP/Auth code publicly.
Helpful Resources
- Hostinger — How to Transfer a Domain to Hostinger
- Hostinger — How to Unlock Your Domain
- Hostinger — How to Point a Domain to Hostinger
- Hostinger — How to Migrate a Website to Hostinger
- ICANN — Domain Transfer FAQs
Related Articles
Continue learning with these WordPress tutorials:
- Increase PHP Memory Limit in Hostinger
- Elementor Stuck on Loading Screen
- Custom Header in WordPress
- Optimize WordPress Images
- WPWithArb Homepage
Final Thoughts
Learning how to Transfer a Domain Name to Hostinger is relatively straightforward when you prepare everything before starting.
First, check your domain’s eligibility, expiration date, transfer lock, DNSSEC status, and EPP/Auth code. Then start the transfer from Hostinger, choose the appropriate nameserver option, confirm the transfer email, and monitor the process until it completes.
Remember that transferring a domain is different from migrating a WordPress website. If you’re moving your website to Hostinger too, back up your files and database and plan your DNS and email migration carefully.
After the transfer, test your website, SSL certificate, email, DNS records, and WordPress dashboard.
Finally, don’t forget security. A strong registrar password, 2FA, regular backups, and careful DNS management can help Secure Your WordPress Site from unauthorized access. Protecting your domain account is just as important as securing your WordPress website itself.

